[ad name=”intheboatshed-post”]


Drawings for plotting coordinates and building the boat
– use earlier printouts for model-making
In case you’ve been wondering, in addition to working on boats and digging the garden, I have found just a little time to work on the intheboatshed.net Julie skiff. Actually what I’m sharing with you today took about four hours!
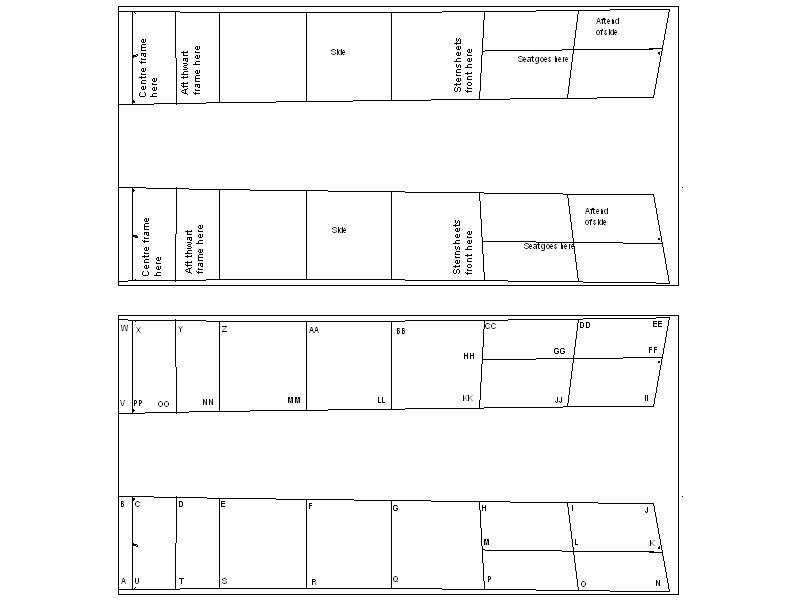
The panels are now plotted onto 8 by 4ft rectangles representing plywood sheets, I’ve used letters to label each of the key plotting points to create the shapes, and I’ve made up tables specifying their positions. It’s dull but necessary work, and we’ve now reached the point where building can begin, particularly for people who know the stitch and glue process well.
In plotting coordinates, I always begin by squaring off the material in 12in squares, which helps with the plotting itself. Don’t be surprised if the material is a little longer than 96 inches – for some reason, in my experience ply is always 48in wide, but a little more than 96in long.
Download the drawings and coordinates in the form of a zip file, together with almost everything else needed to build the boat: julie-skiff-zip-package (To avoid confusion, this is now the complete package, by the way.)
All that remains is my little essay describing all the files, and commenting on issues like shaping or notching the tops of the frames to accept the gapped inwales, oar placement and so on. If you’ve built a boat this way before, you won’t need to wait for my text file on this subject to begin work, and you may not need it at all. Before building, however, I would counsel building a model as described in an earlier post (see below). Phew – after all this work I do hope someone will build it, as I think she’s a handsome, practical boat for rivers, lakes and sheltered waters generally.
If on marking out you find any errors or anything that looks wrong, please let me know – if there’s any doubt, please don’t make a cut but contact me immediately at gmatkin@gmail.com. Mistakes do happen and I’ll fix any you find as quickly as I can, and as soon as my paid work allows me to be at home long enough to deal with them.
These drawings are my work and my property. Individual amateurs are permitted to build one or two boats for their own use from these drawings for themselves but commercial boatbuilders and those intending to build more than two or three boats are required to contact me for permission to build.
I would also warn that I am not a professional boat designer and accept no responsibility for any damage or loss that may result during building this boat or in its use on the water or on land. I would ask that boat users take special care and always take sensible precautions when using this boat on the water including using lifejackets.
I still plan to work up a second set of plans for more traditional-style boatbuilding, and to work up a sailing rig. After all my hard work, though, I hope I can be forgiven for having a few days off from designing and drawing!
If you build this boat – even if it’s a model – PLEASE let me know by getting in touch via gmatkin@gmail.com
See the complete series of posts on this project:
Complete free plans package for the intheboatshed.net flat-bottomed 15ft 7in skiff
intheboatshed.net skiff – drawings and coordinates for stitch and glue
intheboatshed.net skiff – photos of our model, and maybe yours too?
Intheboatshed.net skiff – now we can make a model
Intheboatshed.net skiff progress
Early drawings for a 15ft 5in lightweight flat-bottomed American-style skiff
Don’t miss something good – subscribe to intheboatshed.net
Very nice Gav, an easy to build sweet roomy rower I imagine. One thing I might do, were I fortunate enough to build any boat that took my fancy, would be to cut the drainage arches in the bulkheads at the sides rather than in the centre. Boats never seem to be on a flat enough surface for all the water to run through a central hole. The other advantage is that you can achieve an uninterrupted taped seam along the length sole and side panel join. I think this is featured in Payson’s construction of Bolger’s Gipsy. Very minor points but drainage has been on my mind recently and this one of the things I think I should have done with OB.
I hope to have a go at the model soon.
Ben
Thanks for your kind words. I look forward very much to seeing photos of your model.
Your idea about limber holes isn't a bad one – and easy to do if people wish to.
I'm very half-and-half about limber holes like this in plywood boats, as it seems to me that bouyancy tanks and dry storage are both very useful if not life-saving, and that small pools of water at several frames are perhaps no worse than a single large one somewhere.
One great benefit of having the limber holes central in the frames is that builders who decide to build lightly out of, say, 4mm ply can stiffen their bottoms with a central keelson running along the bottom of the boat. That could be a very good move if light weight is your thing. I'm not wildly keen on extreme light weight myself, but there are people out there who are very keen.
So I tend to favour either drain plugs in pairs to promote air flow or large rotating hatches, and keeping home-built ply boats out of the rain where possible. Storing them upside down is good too!
And out on the water, I find a nice big sponge made for cleaning cars is useful.
Gav
I think that on the water there’s a lot to be said for keeping any water contained between bulkheads. The less it sloshes about the better and the more it accumulates in one or two spots the easier it is to bail. But storage on land is a different matter and water stagnating up against a frame will eventually find its way through a crack in the paint. Keeping the boat well covered or upside down are obvious and, on the face of it, simple solutions but satisfactory storage of OB is something I’ve yet to achieve….
But one should always give priority to on the water considerations and there would be absolutely no point in compromising buoyancy for the sake of easy drainage on the land.
Ben
PS. I also swear by a large sponge:)
Gav, I just found your web site/blog. What I’ve seen looks good. It looks like you have put a lot of time and thought into your plans. I have only just begun thinking about building. I am a kayak fisherman here in south central Florida, fishing inland rivers and the intracoastal water way. I’d like to have a boat to sail and fish the intracoastal and I’m thinking building my own might be the way to go, it would also be more affordable. I hope!
That being said do you have any suggestions for a specific boat? I also like your idea of making a model so that we can flesh out embellishments.
Thanks and sorry for me rambling on, John G
If affordability and simplicity were the only criteria, I think a second- (or third- or fifth-) hand plastic cruiser would be the way.
The reasons for building a boat are likely because you want to, or because you can’t get what you want any other way!
I’m in the UK and don’t know the Intercoastal Waterway, but there are accounts at the Duckworksmagazine website of sailing that water, and many folks on the Duckworksmagazine forum who will be able to tell you what you need. If you settle on building one of my plans, I will of course be delighted – though they are generally small craft not meant by the designer for use on the sea…
Gavin