Norman Fuller launches his Ella plywood skiff built to free plans – and it’s a success!


free boat plans, boat plans, plywood boat, plans, skiff plans, ella skiff, gavin atkin, stitch and glue, tack and tape, wroxham broad, norman fuller

free boat plans, boat plans, plywood boat, plans, skiff plans, ella skiff, gavin atkin, stitch and glue, tack and tape, wroxham broad, norman fuller free boat plans, boat plans, plywood boat, plans, skiff plans, ella skiff, gavin atkin, stitch and glue, tack and tape, wroxham broad, norman fuller

Norman Fuller has launched his Ella skiff built using free boat plans from this website – and has pronounced it a success.

He launched the boat on Wroxham Broad, not far from his home in Norwich. Here’s what he had to say about the project when he emailed me late last evening:

‘Hi Gavin, after a slow start I finally got under way, having not been on the water for many many years.

‘Once I sorted the collars on the oars, worked out where they needed to fit and then nailed them in place, the Ella skiff performed very well. As you see I left the forward hatch open because thats where I kept the nails and hammer.

‘The boat’s very easy to handle and I think the skeg was doing it’s job, as I found I could row in a straight line, which could be some sort of indication the bottom is not skidding.

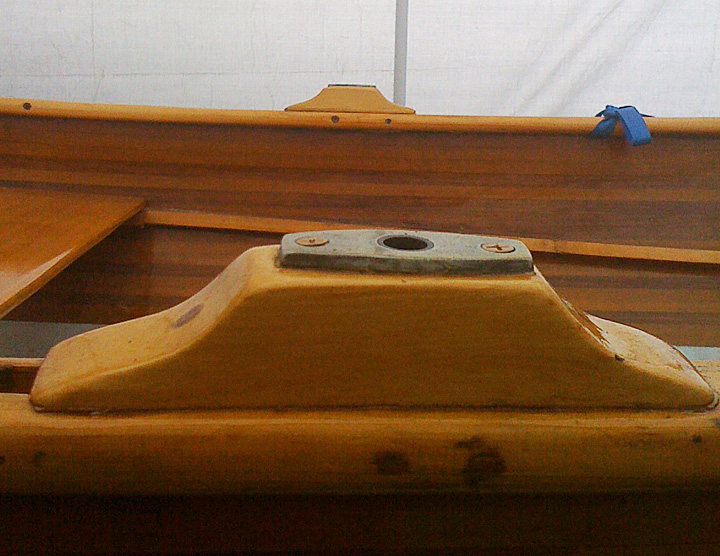
‘Only one was a little bit awkward, and that is the angle of the rowlock’s. I set them in the gapped inwale following the line of the side of the boat, but they need to be more upright, so I think I will change them. My friend Jenny was so proud of what I had done she took me for a carvery, not bad eh?

‘Till next time!

‘Norman’

From the pictures, I think the problem you had with the rowlocks is that they could be higher – the choice is between lowering the thwart and raising the rowlocks, or both.

I’d start by screwing a 4-6in by 1 1/2in by 1 1/2in block with chamfered ends onto the gunwale for the rowlock to fit into. It’s easy to do, you see it done very often, and when the block wears you can replace it. Small people and kids won’t need them, but I should add these blocks to the plans. Here’s an example of how it would work; and here’s another from intheboatshed.net reader David Luckhardt.

The Ella skiff is a lightweight general purpose stitch and glue flattie skiff for use in sheltered waters. She’s 12ft long overall by 4ft beam, by 400lbs displacement, and is designed for stitch and glue construction using 1/4in or 3/8in 4ft by 8ft plywood. It is meant to be a simple and quick stitch and glue building job of a size that is convenient for building in domestic garages made to take a small to medium-sized car – which probably describes the building area available to most people. For more on this boat and the plans, click here.

Low power skiff – the nested panels

[ad name=”intheboatshed-post”]


The nested panels for the Low-power skiff. Click on the thumbnail above for a larger image

This may not look like much to you, but to me it represents the latest stage in quite a few hours work, first defining the overall form of the 16ft small outboard skiff project I’m working on for a friend, then developing the panels required to create it, and then figuring out how to nest them into 4 by 8ft panels of ply for stitch and glue construction with the least waste.

As you can probably imagine, it’s been keeping me busy lately – and I need to get it out of the way because I have a VERY IMPORTANT new project to start and complete. Watch out for that, if you’re interested…

What are all the components I’ve plotted here? The top row are the heavy weights – the 1/2in components including the breasthook, bottom, central girder (my friend asked for that to ensure the bottom came out the right shape), the main frames, and the doubled frame on which we’re going to hang the outboard. The bottom row are the 3/8ths components, including the sides, bits of decks and so on. The next task is to plot about a million coordinates to enable my pal to cut the thing out accurately, and with all these parts to work with the task should keep both of us busy for some time!

One thing that doesn’t appear here that I’m also thinking about is a proper name, and I have to say that I haven’t thought of one that seems to suit it. I did wonder about naming it after my grandmother, whose name was Elsie, but she wasn’t exactly low powered. Then I thought about our sweet pet dog during my childhood, but her name, Sooty, doesn’t seem to fit. And then I thought about my elegant sister – but I suspect she wouldn’t thank me for naming a fairly utilitarian boat design after her. So how about a place name? How about the Barton skiff, which might be named after the place where I first conceived the notion that such a boat should exist. What do you folks think? Does this design look like it could be called the Barton skiff to you?

To find out more about this low-powered outboard skiff project, click here and here, and, for something I learned about after drawing this skiff and which seemed to endorse my concept, click here.

ALSO – see the latest post on this project.

A new model of the Sunny skiff

[ad name=”intheboatshed-post”]

model_bow2

model_stern model_overhead2

Sunny skiff model – download both model-making and full-scale plans here

I’ve been happy today to hear from a reader who has made a model of the Sunny skiff that she has been working on and has kindly sent them over. The model maker described the little boat as ‘a thing of beauty’, so I you can probably imagine I was very chuffed indeed.

I’m always pleased to see shots of models of my designs, so if anyone else has any to share, please send them over! I’m at gmatkin@gmail.com.

This boat is designed to be built using the stitch and glue technique – if you haven’t done this before you might be interested in my book Ultrasimple Boat Building: 17 Plywood Boats Anyone Can Build or one of the other books on this topic available from Amazon.